Showing posts with label birthday. Show all posts

Saturday, August 28, 2010

Sister-In-Law Summer Apron Guide

My SIL is big into the holidays - she always goes all-out with the decorating, creating themes and generally making a big fuss. Christmas, Halloween, New Year's Eve, Easter, Fourth of July, birthdays - all are cause to get the house dressed to the rafters, and the people, too.
I've noticed that aprons seem to be coming back as a trend lately, and she has a few themed aprons, so I thought she might like a nice picnic apron to wear for their many backyard cookouts. Add to my inspiration a neat black and white checked shirt in the donation bag, and this apron was born.
Modeled by my nifty dress form (with my favorite Tshirt preserving her modesty), this apron looks longer than what it actually is, although it is longer than a standard apron, falling to below the knee. My SIL is pretty tall (taller than me anyway) so I made this a bit longer than I would need it, using the whole front of the shirt from just below the collar, all the way to the hem. For a shorter person or just a shorter apron, you could very easily adapt this to be a bib apron, with a tie around the neck and ties added at the lower edge where the sleeves are cut off.
Anyway, to make this, all you will need to do is find a suitable shirt. I chose this button down with a collar and a pocket (because aprons need pockets), but most any shirt should do.
First, iron the shirt. I hate ironing, and avoid it whenever possible, but this will make your job much easier.
Now, cut the shirt straight across as close to the neckline as possible, without involving the collar. Then cut off the sleeves along the seams. You can pick out the side seams, but this shirt was very ruggedly constructed, with jeans-style side seams, so I just cut them out, as well.
Pin the button plackets together, and run a straight stitch up both sides of the buttons, through the top and bottom layers. I disguised my stitches in the seams that were already there. Now your buttons look cute, but they won't come undone.
Hem your raw edges. I used a plain old ruler to make where the shoulder seams were cut out more angled rather than curved, by measuring an equal distance from the buttons to each shoulder seam and marking it, then cutting off the excess and folding it over twice and hemming.
I made the ruffle by cutting two 3" wide strips from the back of the shirt and sewing them together to make one long strip. I then hemmed the bottom edge, ran a basting stitch through the top, and ruffled it as I pinned it to the bottom hem of the apron. (Here is a great tutorial for making ruffles. It's sooo much easier than it looks!)
All that was left to do after that was to fold over about an inch of what used to be the neck of the shirt, and sew all the way across to make a casing for the waist tie, thread the tie through the casing (I used a piece of salvaged woven cotton tape, hemming the ends so they wouldn't ravel) and voila! new apron!
If you want to go the extra mile, you can add an appliqué, like I did. The fabric reminded me of a picnic blanket, so I decided a watermelon would be perfect. I just cut a triangle out of red craft felt, a semicircle out of green felt, and sewed them to one corner of the apron where it looked right. Of course, it wasn't until after I had folded it all neatly, tied it with its own strings, and taken this picture
that I realized I had forgotten to embroider the watermelon seeds. {sigh} I did get them done, in the car on the way to her house. I thought about embroidering a line of ants across the bottom, too, but decided against it.
Hope this is inspiring, and if you make a shirt apron using this idea, I'd love to see a picture of it!

Wednesday, July 15, 2009

Furry Friends

I try not to be too crazy about my family on this blog, for their sake and yours, but I just had to welcome my newest furry friend, Zoey the kitty, to the family in a big way. Why, you ask?

1) After the spraying, clawing, and insane howling of our old tomcat, my husband swore to never allow another feline into the house. Ever.
2) After the spraying, clawing, and insane howling of our old tomcat, I didn't think I would ever want another feline in the house.
3) I tried to think of another reason to list here, because three is a nice round number - but really, spraying, clawing and insane howling are way more than reason enough for me to think I would never have another cat.

Anyway, after we sent the tomcat to go live on a farm where he could be happy outside chasing mice*, I really felt the lack of a cat in the house. I knew that there would be no convincing DH to agree to get one, but that didn't stop me from dragging him over to look at the cats in them adoption center in PetSmart, or informing him that there were kittens free to a good home down the road from us.

DH must have picked up on my *ahem* subtle clues over the last two years, because yesterday he came home from work early, changed his clothes and had me get in the car -refusing to answer when I asked where we were going, but assuring me that jeans, sandals, my old Red Wings t-shirt and a messy ponytail were appropriate attire.
I have to say that I had no idea where he was taking me. When he pulled into the parking lot of the Humane League of Lancaster, I actually teared up a little. DH now thinks I am completely clueless, and I have to agree with his reasoning - just a few days ago, DH and Thing 2 were cuddling on the couch, whispering and seeming very secretive. When I asked them what they were being so quiet about, Thing 2 announced, "We weren't talking about getting you a puppy..."
In my defense, it did cross my mind that maybe DH was thinking about getting me a kitten for my birthday, but I didn't expect to be taken to the shelter to pick one out two days before my birthday. Just sayin.


So, Zoey is a sweet, affectionate (or maybe just territorial), four year old calico. This is the best picture I could get of her because she hasn't been still for more than a few seconds at a time - at least, not when I've had a camera around.
She seems to be fine with the boys, but she's not quite sure about the dogs yet (we're keeping her by herself in the guest room right now, with a towel that the dogs slept on to get her used to their smell, as per the instructions from the very helpful staffer at the Humane League). We have introduced the dogs to her, and she got her back up and ran from both of them, but only clawed at Lucky- which is understandable, Lucky has been giddy and goofy since we brought Zoey home, and was a little overly friendly when she was introduced.
Zoey seems pretty relaxed since we brought her home, and eager to get out of her room and explore. Even DH seems to like her - yay! Welcome to the family, Zoey.

*(seriously, that's not just what we told the kids, a nice Mennonite family adopted him as a barn cat)

Tuesday, July 14, 2009

Generosity Rocks Out Loud!

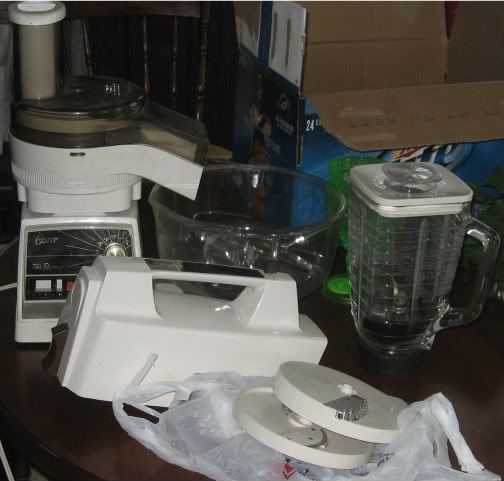
Guess what some sweet Freecycler gave me for an awesome free pre-birthday present? (They didn't know it was a pre-birthday present, but I do!)


Oh yeah. I am so geeked.
Revel in the seventies awesomeness.
I will be able to slice and dice and grate and mix like nobody's business. I'll have to make sure I post pics of the incredible foodness that is sure to follow.
Whatever.
You know you're jealous.
But just cause I love you, I'll post pics of (and the general recipe for) the cake I made for MIL's 50th birthday, anyway. Pre-processor, of course, which just makes it even cooler. (Things 1&2 were soon un-thrilled with being allowed to use the grater, let me tell you... 4 cups of carrots is a lot!)


Crazy-good Carrot Cake*

4 cups grated carrots
1/2 cup brown sugar
1/2 cup white sugar
1 cup applesauce
1/4 c oil
1/2 cup raisins, ~just~ covered in water and microwaved for 30 seconds, then drained
1 cup whole wheat flour
1 cup white flour
1 teaspoon baking soda
1 teaspoon baking powder
1 Tbsp cinnamon
1/2 teaspoon ginger
1/4 teaspoon ground cloves
2 eggs, lightly beaten-? (I think I added eggs; I honestly can't remember.)

Mix dry ingredients, and sift together. In a separate bowl, mix wet ingredients together well, then add to 'dry' bowl. Mix thoroughly, but quickly - Pour batter into greased and floured cake pan(s), bake in 350-degree oven for approximately one hour, or until toothpick inserted into middle of cake comes out clean.

*All amounts are approximate - I looked up a bunch of carrot cake recipes online, and then took the ingredients I wanted and a few I thought should be included, and guessed on how to best put them together. Feel free to use all whole wheat or all white flour, all white or all brown sugar, whatever you happen to like better, with the understanding that results may vary. My cake rose well, and was moist without being sticky.

Frosting (well, kind of)

I made a fondant-type frosting- for the first time! I used the same method as above, researching fondant and then just flying by the seat of my pants. It was delicious - but sweet!

1/2 cup honey
1/2 cup margarine or softened butter
1 teaspoon vanilla extract
dash salt
2lb. bag of 10x confectioner's (powdered) sugar

Combine honey, vanilla, and butter completely, add salt and slowly sift powdered sugar into the mix (I added it by the 1/2 cup), stirring until completely mixed after each time. Eventually (after about 2 cups for me) the mix will be more solid and almost doughy. When this happens, put the dough in the refrigerator to chill for at least an hour. Remove frosting, lightly dust a smooth surface (I just used the counter, but a cold pastry marble would be awesome for this) with sifted powdered sugar and knead more sugar into the dough. When the dough begins to look more flat than glossy, it should be about done. This part you'll just have to experiment with, because you want it to be dry enough to handle, but wet enough to not crack as you drape it on the cake.
I frosted the cake very lightly with store bought cream cheese frosting, then rolled out sections of my frosting and covered the whole cake. They don't have to be perfect, you can trim them and mold the edges together!
With the left over icing, I kneaded food color into it, rolled it out and used a cookie cutter to make the stars (I found an easier way to do it after I was finished - of course- but that's another post) which I then placed strategically over areas where the frosting was less than smooth.
(One caveat - be careful with poking toothpicks into the cake, or wrapping it - this frosting is like play clay, and stays partially malleable the whole time. If you look closely, you can see the wrinkles where I tightly wrapped this with plastic wrap to keep it in place during the 1-1/2 hour drive to MIL's party!)


Ta-daaa!