Showing posts with label handmade. Show all posts

Sunday, March 20, 2011

Spring Has Sprung!

Well, I have been so busy keeping my other resolutions that the blog has sort of fallen to the side. I lost a bunch of weight already, and have also been in a frenzy of organizing and purging and planning new projects... Don't worry, though, I have all sorts of craftiness to share!
I finally finished and sent the Giftmas goodies for my DearSis and all her awesome family. I know, I know, I know... it's March. Last year the gifts went out in May (I think?) and I didn't even have a good excuse, so I figure I'm ahead of the game!
Also, instead of some handmade and some store bought, this year I sent all handmade gifts. Hand knitted skirts for her 3 girls,
a car caddy for the nephew,
a crocheted scrubbie mitt for my sister (which was one of the fastest things I made, so I forgot to take a picture, of course) and just a gift card for BIL - by that point, I couldn't stand making anything else. Sorry, bro. You'll get homemade brownies next year. In July. ;)

So, here it is, the first day of spring, and love is in the air! The baby lambs are frolicking in the fields, and I'm starting to see calves in the pastures and smell the scents of spring. (I seem to forget every year that the first few days that are nice enough for me to open the windows are also the first few days that are nice enough for the farmers start spreading manure.) In the spirit of love, rather than manure, I whipped up this nifty little gift pillow today!

It has a zipper down the side, and is actually two small pillows with a heart-shaped space in between for your gift to hide.

To make this, you will need:


  • 4 pieces of appropriately sized fabric, 2 for lining and 2 'pretty' pieces for the outside (we'll look at how to determine the size in a minute)
  • batting or fiberfill
  • zipper, velcro or other fastener
  • needle and thread (You can hand sew this if you want a small one, or use your sewing machine for a bigger one. A zipper foot isn't necessary, but might make your life easier.)
See? Not too complex. Of course, I made it harder than it had to be. Cuz that's what I do. Make sure you read all the way down, and check out the "What I Learned" section before attempting!

The first step is to determine what size you want your pillow to be. I had a 7" zipper on hand*, so I determined that one side of the pillow needed to be at least that long. So I made a half-heart template, making sure that the outside straight line was seven inches long. I just used a paper plate to trace the curve, cut out my template, and made a few snips here and there until it looked just right. Make sure to leave an even seam allowance!

*Had I thought just a little more, I would have realized that it could have been any size had I used Velcro instead.
The pillow itself would have been more even, and the opening seam would have been almost completely hidden, like I wanted it to be. Of course, I went right ahead and used a zipper, not even thinking about the fact that a) I have only ever sewn in a zipper once before, and b) with my limited sewing skills, there was no way I was going to be able to successfully hide a zipper in a seam. But hey, live and learn, right?

My fabric was a really soft and slinky remnant that I had picked up somewhere, perfect for a pillow, but scary for me to work with. I debated for a while, and finally decided to use the freezer paper stenciling idea and just adapted it to my needs. I cut the pattern pieces out of waxed paper, then carefully pinned and ironed the waxed paper to the fabric before cutting the fabric. Worked like a charm!

I just left the waxed paper on while I sewed the lining and outside pieces together, of course remembering to leave a small hole (in the same place on each half) for turning and stuffing.
I pinned the zipper in place on the wrong side of one half of the heart. I aligned the two hearts, and pinned the second half to the other side of the zipper. Then I flipped the pillow over and topstitched the zipper in place, and all around the outside edge on both sides.
Then I stuffed* it. Not too firmly, remember. I turned and pinned my stuffing holes, then ran another top stitch all the way around to connect the other sides, making sure to catch the raw ends of the stuffing holes in my stitches. Unzip, et voila! A nifty pillow with a semi-hidden zipper to stash your love notes, or... y'know... other things.
No judgement here.
*All of the lint is from my stuffing - I used shredded socks. Seriously! Gives the pillow a nice weight, and is soft and comfy. They were bleached within an inch of their life before being consigned to the shredding bin, fyi, because I know my imaginary readers are all like "Ewwww..." right now.

What I learned from this project:
  • Waxed paper is awesome.
  • I could have sewn the zipper in at the same time that I was sewing the lining and front pieces together, and saved a few steps and a lot of time. I will do that, or use velcro to close the pillow, next time.


Monday, December 20, 2010

Making Christmas #3: Toy Car Tote

I was clicking through the internet one day and saw a little tote for toy cars, with pockets for the cars on one side, and a play area on the other side, that folded up and had a carrying handle. I loved the idea, and after weeks of thinking it would require much more than my feeble sewing skills, I had found enough courage to try it. So of course I couldn't find the web site again. After hours of fruitless googling, I figured that there were a few design features I hadn't been crazy about, anyway, so I would (as usual) just make up my own pattern and (of course) just wing it. And here is my version of a toy-car tote - nowhere near as cool as the original that inspired it, but super-simple to make, small and portable and enough to keep that certain little boy entertained on the go. Enjoy!

This is how to make the toy car tote I made for my nephew, out of an old shirt. First, find an old cotton shirt, or some sort of leftover fabric. I chose the shirt because it was a slightly heavier, durable cotton, but you could use any type of fabric, I suppose. This was a women's large, and I had more than enough fabric.
Next - measure and cut your fabric. I just pinned an 8 1/2" x 11" piece of craft felt to the shirt, and cut around the edge through both layers of the shirt to get 2 pieces of fabric. Easy peasy lemon squeezy. The cat even helped out.
Now you will add your "road". Pin it 2" in from one short edge on the right side of one of the pieces of fabric. You will notice I forgot to embroider the yellow lines on the road before I sewed it on - it is not fun trying to embroider them on afterwards, so if you want them take care of it before this step!
Pin one end of your elastic, and use your cars to see where you need sew down in between, like so. First one car, pin to mark it,


Then the next car, pinning to mark, and so on.

I found that 5 cars fit well on this size fabric.
Sew next to your pinned markers, going back and forth a few times to make sure the elastic is secure. Make sure you sew the edges, too. Turn your piece and sew the long edges of the "road" to your fabric.
I also neglected to put on a handle at this step, when it would have been easiest. If you have a piece of nylon webbing, that would work great as a handle. Pin one piece to the bottom, with the handle part pointing towards the center of the carrier. I know it seem counter-intuitive, but it works. Promise. Lay your two pieces of fabric right sides together, with the handle sandwiched in between, and sew down one side, along the bottom, and up the next side. Reach in, grab the handle, and turn. Ta-daa!
After that, raid your recycling bin for an old cereal or cracker box near the same size, and cut it as shown. Since I was using paper sized fabric, I just cut the front of the box to 7 x 3, 7x3, and 7 x 1-1/2.
Maybe there is an easier way to do this, but I don't know how, so this is what I did - put one piece of cardboard in to the bottom of the "bag" you made, between the two layers of fabric. Leave a small allowance so that you don't sew through the cardboard, and sew across. Insert the 7" X 1-1/2" piece of cardboard, leave a small allowance, and sew across. Add the final piece of cardboard, your second handle if you're using handles (the ends tucked in between the fabric pieces with the handle part out and pointed toward you), and fold the ends under. Pin and topstitch across to seal it shut. Sew on a button to keep it closed when it's folded up, and yay! Done! Fill it with cars and give to your favorite little boy!

Wednesday, December 01, 2010

Making Christmas #2 : Crafty Christmas

I made a plethora of crafty gifts for my favorite people last Christmas. These are just the ones I remembered to take pictures of.
First up, we have these adorable covered barrettes from Angry Chicken's tutorial, and soft knit curlers inspired by these. They are both for my Niece 2- whom, DearSis informed me, gets along amazingly well with her sisters when they play beauty shop.
Niece 3, who is usually the customer at 2's beauty shop, already has perfect Shirley Temple curls - but what the heck, it's just to play with, right?
The barrettes are great for wispy little girl hair, and really cute (although the tutorial ones are way more adorable than my hand-sewn versions), and I'm making myself some of the soft curlers - hopefully using them will eliminate the foul memories I have of when I would get my hair did as a kid- I still occasionally have flash backs of trying to fall asleep with those nasty curlers with the brushes inside poking my head, and the pink plastic picks that always seemed to dig in deeper the more you tried to get comfortable. Ugh.

I didn't really write a pattern, but here's a quick summary of how I knit the curlers. They're a lot of fun to make, quick knits that I mostly worked on while watching TV with DearHubs at night.

Knit Curlers

  1. With any weight yarn, and double-pointed needles approximately 2 sizes too small for the yarn you are using, cast on six stitches.
  2. Knit 4 rows.
  3. Knit 2 stitches, bind off two stitches, knit last two stitches. Turn.
  4. Knit two stitches, cast on two stitches, knit last two stitches. Buttonhole made. Turn.
  5. Knit across.
  6. K2tog across - You will now have 3 stitches on your needle.
  7. Knit i-cord for as long as you would like ( I tried to keep it about 2 inches for my small curlers, but you could of course go longer for larger ones), keeping track of how many rounds you knit.
  8. When you have reached the desired length, begin increases.
  9. Kfb in each stitch for 2 rounds - you should now have 12 stitches, divided onto at least three needles.
  10. Knit around for the same number of rounds as your i-cord.
  11. Stuff curler with small amount of batting or fiber-fill, enough for it to be firm but not so much that the stitches stretch out. (Seriously, you only need the tiniest bit of batting for each curler. I shoved mine in with a knitting needle.)
  12. Begin reducing - k3tog first round (6 stitches left), k2tog next round (3 stitches left). (If you're going to be using a button on the end, go straight to step fourteen and fifteen, and then just use the leftover yarn to sew on your button if possible. If not, weave in your ends, sew on your button and voila! You're done! Go curl your hair! If you're making this for children, like I was, continue as written, with the i-cord knot at the end rather than the choking hazards also known as buttons.)
  13. Begin i-cord - you're going to want at least an inch.
  14. Leaving stitches on needles, cut your yarn, leaving a decent tail (at least two inches)
  15. With tail, thread a yarn needle and pull yarn through each stitch, sliding the stitch off the needles as you go. Pull yarn tightly and knot.
  16. Now, use the tail of the yarn to help you knot the smaller i-cord at the end of the curler, clipping excess once you're done.
There you go! Now rinse and repeat, until you have a headful of these things.

This 'pattern' is so easy to customize - for bigger curlers, use heavier yarn and bigger needles; for longer ones, knit more rows; you get the idea. I like the fact that you can make these to suit yourself, rather than trying to force your head to work with the generic one-size ready-made store-bought plastic scratchy ouchy blech. Have little wispy hairs? Make a few little teeny curlers. Thick, heavy hair? Jumbo curlers it is (although you may want to wait until your hair is already mostly dry before using these - experience speaking!)

Tuesday, November 23, 2010

Making Christmas #1- Colored Corn

This is a fun little project.
I have seen multi-colored popcorn in the grocery store before, but I wanted specific colors. I searched the internets, but couldn't find a great tutorial, so of course, I figured I'd make one myself :) That's kind of what I do.So, if you've ever wondered how to dye popcorn, this one's for you. And just in case you were wondering, this only dyes the kernels, the popcorn will still be white.

For step one, you will need:
  • popcorn
  • glass jars with tight-fitting lids (I used pint canning jars, which held about 1 cup of popcorn each)
  • food coloring in desired colors
  • water
Fill the jars with popcorn. Make sure to leave about an inch of headspace at the top of the jar -or more, if you are using larger jars! The popcorn will swell, which can make it pack tightly in the jar and it will be difficult to get out if you haven't left some room.
Add water. I just ran enough water in the jar to cover the popcorn and fill the jar, I didn't measure it.
Add food coloring. I used about twenty drops for my pint-sized jars, but if you are using larger jars adjust the amount accordingly. You're going to want to add enough to make your water pretty dark.
Now just let it sit for about 24 hours. I shook mine occasionally, and turned it upside down for a few hours at a time, just to make sure the food coloring got everywhere once the popcorn started sucking up the water.
On to step two!

For step two, you will need:

  • paper towels
  • baking sheets
  • oven
This is pretty straightforward. Just drain the colored wate
r (I saved mine for making another batch down the road) and spread the kernels on a baking sheet lined with paper towels. Then dry the kernels. I used the oven, set at its lowest temperature (170) for two hours, checking every twenty minutes or so. But you could also air-dry it, if you have the time and patience!

Now you have Christmas colored popcorn! Package it all pretty, and enjoy!


Tuesday, May 05, 2009

Post # 18, Mother's Day Week

In which I do not kill anything, and I also try my hand at a new craft experience.
I have, rather than the desired 'green thumb', one of those black thumbs that people talk about. It's pretty much a running joke. In fact I currently have a pot that, at Easter, contained beautiful living tulips - but now contains only a brown mass of withered leaves. Maybe this is how tulips behave when they have finished blossoming, I don't know... but it makes me sad when I kill plants, because I really do love them, and they way they look inside the house and out.
When we first moved to Lancaster County, I was overwhelmed with the urge to grow things. Plants just thrive here, and all the conditions come together to create some of the best non-irrigated farmland in the country, possibly the world. Plus, the overwhelming beauty of all the trees and flowers blooming in the spring - it's enough to make even the most avid devotee of silk plants consider attempting to maybe keep at least a little cactus. Just to give it a shot.
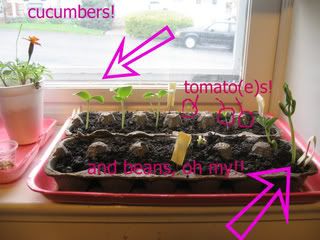
Well, I am proud to announce that, after putting it off for four years, and only one failed attempt, I have not killed some plants! Yay!
Photobucket

(See the bonus marigold? There is also a hyacinth growing next to it- planted in a nifty self-watering pot - that wouldn't fit in the picture.)
All of these were sprouted by moi. Using recycled planting materials, no less. (Pats self on back)
Now, in the interests of full disclosure, I did kill the first round of seeds I planted; they became moldy, and only the beans seemed even interested in trying to sprout... but I have narrowed it down to four possible reasons why this may have happened:
  1. The dirt. I figured that the clay-ey, sticky soil around here is good enough to grow literally tons of corn and what-not, so it should be good enough to start my seeds, right? Besides, those expensive potting soils are just full of chemical fertilizers, anyway. I failed to remember that the soil around here is also liberally treated with non-chemical fertilizer, in the form of liquefied cow poo. How I failed to draw this parallel at the same time that the pungent aromas of spring were drifting in through my open windows, I don't know. Apparently, I am not a smart person.
  2. Over-watering. I figured seeds are dried, they must need a lot of water to get started. I may have been a bit neurotic about the watering.
  3. The water itself. The reason that chlorine is put in city water in the first place is to dissuade bacterial growth. It would only logically follow that trying to make plants grow with chlorinated water would probably be counter-productive. This did not, however, occur to me until the moldy, half-sprouted seeds were already being mourned. In my defense, this is I think the first time I have had city water in my life.
  4. Plants just don't like me. I may to go with this one, since it involves only a slight blow to my self-esteem, rather than acknowledging that I got pretty much every aspect of growing plants horribly wrong.
So, I set out to correct what I could, using my now severely depleted seed supply. I bought potting soil, rather than relying on my own front yard dirt (for now), I watered much less than I had the first go-round, and I also made a point of not watering the plants with any water that hadn't been sitting for at least 24 hours to let the chlorine dissipate. I also smiled at them a little more often to make myself more likable. Maybe that helped, because, as you can see from the picture, I have potential vegetables! It seems as though nearly 80% of the seeds decided to grow - yay! I don't know if that's a good ratio or not, but for me, anything more than 20% would have been considered a success!

In other, somewhat unrelated news, I have tried my hand at jewelry-making!
I made these lovelies for my mom and MIL, for Mother's Day. (Yes, I know I shouldn't be advertising what I made my mother and MIL on the interwebs, where anyone could wander across it and spoil the surprise, but we all - and by that I mean I- know that no one reads this blog anyway, and the chances of either of them stumbling across it and finding out what their gifts are in the next five days is roughly the same as the odds of Death Valley flooding. So I think I'm good.) Here they are, being modeled on my favorite shirt, mother's day birthstone pendants!

Mother's Day,Mom,Mother-in-law,necklace,pendant,jewelry,beaded,birthstone,handmade

Aren't they pretty?
The one on the left is for my MIL, the gems being emerald for my BIL and ruby for my DH. The one on the right is then, obviously, for my mom - aquamarine for my brother, rubies for my sister and I.
I made both of the charms with beads I picked up at the Lancaster Bead Company and some things I had at home already; all the beads and both necklaces ran about $40 total. IMHO, that's not bad for something nice and sparkly like these. Especially if you have gone out and priced mother's rings/pendants first, like DH and I did last week... ~shudder~. Even the 'simulated' (or, as fake as fakey fake can be) gemstone rings cost a ridiculous amount of money.
I like 'em (the moms, I mean), but there was just no way we could buy them both mother's rings.
For each pendant, I used two round silver beads and two smaller hematite beads, plus the birthstone beads and a decorative separator bead in between.
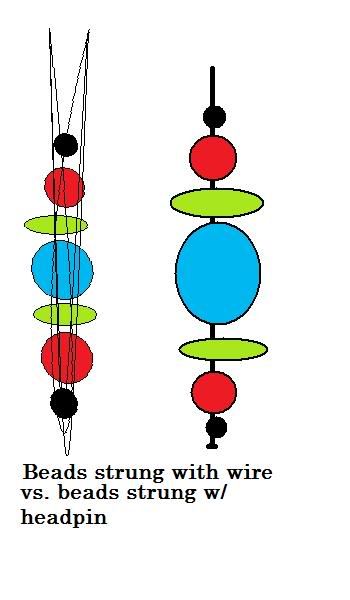
I strung them on thin silver wire, which made this waaay more difficult than it could have been... I had some previously purchased 32 gauge wire, which was quite a bit thinner than what I really needed. I twisted it back on itself (securing the hematite bead at the bottom first to keep all the other beads in place), and then ran the wire up and down the center of all the beads a few times to make it less likely to break. Doing that also created the bail (the loop that the necklace goes through) at the top.
If I were to make another one of these, I would use a head pin instead - much easier and faster to string the beads onto it, and the top could just be bent down with a pair of pliers to make the bail once the beads are strung. Example:
Photobucket

It took me about thirty minutes to make each charm, not including dithering some more over the layout of the beads (DH was about ready to scream in the bead store, I was changing my mind so much, but he was being good because he was trying to convince me we need a PS3... I'll take the cooperation with my indecisiveness however I can get it, though).
Had I bought the headpins, it probably would have taken me five - ten minutes to make both charms, not including dithering time.
I hope the parental units like them, rough as they are. Does the extra (ahem- and possibly unnecessary) time and effort I put in negate the obviously homemade nature of the gift? I'm not above pointing it out, if I have to...
(I could go off on a rant about how the appreciation of a handmade gift generally decreases in direct proportion with the age of the giver, but I'm trying to be positive here...)
I have to get my mom's in the mail, probably today, to make sure it gets to Florida in time, but we should be having supper Saturday with DH's mom, so I'll get to give it to her in person and see if she likes it or if she's just being nice about it. she'll probably like it though.
Happy Mother's Day to all the moms out there! I hope you get something you like, whether it's a piece of handmade jewelry, or a dishwasher (DH has been dropping some not-so-subtle hints that he's probably getting me one - I'm cool with it!), or extra quality time with the kids.