Tuesday, August 31, 2010

Batter Up!

Have I ever mentioned how much I love my sister? She's pretty cool. My DH had a milestone birthday recently, and she was on the ball so to speak (~giggle~) and worked with me to get him a pretty awesome gift. She knew that the Things 1&2 and I were going to take him to the
Baseball Hall of Fame and Museum in Cooperstown for his special day, so she got him a bat engraved with his name and a message.
He absolutely loved it (I knew he would, because I had to work pretty hard to distract him from buying one for himself while we were in new York!) and he immediately wanted to display it, but... we had no way to hang it.
There are hangers available out there, as well as display stands. Some of them are all fancy and laser-engraved, and some are even reasonably priced, but I hate buying something that I know I could make myself. I searched the internet to see if I could get some tips on how to make one, but for once the internet failed me! I found not a single thing about making them, just ads to buy one. I was amazed,because they seemed so simple to make. Well, I cleaned up my rarely used basement workshop, and the spiders and I spent some quality time together while I figured out how to make a baseball bat hanger for my dear DH.
I just used what I had available, and as usual I was completely flying blind, but I'll explain it all as clearly as I can and give you my suggestions for doing it better than I did.
The holiday coincided with DH getting a promotion at work, so I also made him a business card holder for his desk. That was pretty simple, so I'll throw it in, too.


Baseball Bat Hanger or Stand


I designed this to do double duty, since DH's office has cement walls and he can't hang it there, but he may want to hang it if he decides to display it at home instead.

Materials and tools:
  • 4 wood screws (at least 2" long)
  • Wooden board. I used an old 2x4 I salvaged. For both the holder/hanger and the business card holder, I used less than a 3ft length.
  • Jig saw
  • Drill with standard bits
  • 2" paddle bit
  • Sandpaper
  • Wood glue
  • Wood burner, felt, picture hangers (all optional)
Okay.
This is my first attempt at a tutorial slightly more than basic, so bear with me, and feel free to ask questions in the comments section below.
First, measure, measure, measure! My brain hurt from all the math I was doing, because I'm one of those people that just eyeballs things. So, this was definitely outside my comfort zone.
Measure the neck of the bat (handle? Not a sports person, sorry) just under the knob at the end, and the widest part of the barrel. A flexible tape measure, like for sewing, will give you the circumference, but mine went MIA just when I needed it so I used a ruler to measure the width, and just used that number. It worked out fine.

I used centimeters because doing fractions gives me hives, and got 3 1/2 cm for the neck measurement, and 6 cm for the barrel.
So now I know that the parts I cut out (where the bat will rest) need to be at least 6 cm long, but I added some length for stability. I believe the final measurement I went with was 10 cm, but this ended up being a bit too thin, and when I was jigsawing the base where the barrel of the bat would rest, it broke. This was probably partly because I was using an old board, but I would recommend doubling your largest measurement, which would be (because bats are pretty standard) 12 cm.
Cut 4 pieces of your 2x4 to this length. One will be notched out for the top of your bat, one will be notched for the bottom, one will be the backing to the top and the last one will be the backing piece to the bottom.
Still with me? Okay, here we go. More measuring. Deep breath.
Take one of your cut pieces and mark the center by using a ruler to make an x from corner to corner. Determine what you want to be the front of your piece and draw a line from the center of your x to the front of your piece. It should look like this:
We good?
Okay.
Now measure from each side of the line you just drew along the front of the piece, and mark 3 cm to the right and the left of the line. Use these lines to draw a curve to the center of the x that mimics the curve of the bat. I actually stood the bat on my piece of wood and traced the curve, which worked pretty well. Use your jig saw to cut out the curve you just drew. I found that cutting through the center line to the middle of the x, and then along the curve from each side to that point worked well. Sand the inside of the curve and along all the edges (except the back ones!) really well.
Almost halfway there!
Mark the center of your next piece of wood in the same way, with an x, and then draw a line to the front like before, and another to each side. Your piece will be marked like this:
Measure 1 1/2 cm to each side of the line you drew to the front of your piece and mark. Draw a line from each of these measurements to the second line you drew. Now your piece is marked like so:

Now, those of you who are mathematically sharp are saying "Hey! Our measurement was 3 1/2 cm, and that's only 3 cm wide! What gives?" Or maybe not. But this is slightly narrower because the neck of the bat flares at the end, so making this measurement narrower than where we measured means that the bat, once placed lovingly in its handmade display hanger, will be locked in securely enough to not accidentally fall or slide out.
Now, after securely clamping your wood to your work bench (found out the hard way that this is much safer than trying to hold it - ouch!) take your 2" paddle bit and place it with one edge on the center of your x, and the center of the bit on the line you drew to the front of your piece of wood. Drill about 3/4 through the piece of wood and flip it over. You should be able to see where the center of the bit has already punched through the back, so use that to center your bit (remembering to secure the wood first!) and drill through the remaining 1/4. Turn the piece back over, use your jig saw to cut along the last two lines you drew (the ones marked in red on the diagram), and sand all your edges except for the back ones.
Hooray! Almost done!
Now, spread some wood glue on the back narrow edge of your top hanger, and align with the bottom of one backing piece. Clamp and let it dry.
Apply wood glue to the back edge of your bottom hanging piece, align in the center of of the second backing piece, and let it dry (clamping this seemed awfully difficult, so I deemed it unnecessary).
After about an hour or two, these pieces should be stable enough that if you'd like, you can use wood screws to secure them. Just make sure that you drill pilot holes and countersink your screws. I would think that glue would be sturdy enough to hold them, but I screwed them together because I didn't have time to let the glue dry. Sand all the sharp edges, and decorate!
I -again, because of time constraints and because I liked the look of the salvaged wood- just used a woodburner to add DH's initials, but you could paint this or seal it and really make it look amazing. I glued felt to the back so that it would not scratch DH's desk (because I forgot to countersink my screws - again, do as I say, not as I do, I made the mistakes for you!) but if you wanted to hang this on the wall you could either screw it directly to the wall from the front, or use picture hanging hardware to hang it.
I'm worn out, I will have to post how to make the business card holder separately. Good luck and I would love to see pictures if anyone makes this!


Saturday, August 28, 2010

Sister-In-Law Summer Apron Guide

My SIL is big into the holidays - she always goes all-out with the decorating, creating themes and generally making a big fuss. Christmas, Halloween, New Year's Eve, Easter, Fourth of July, birthdays - all are cause to get the house dressed to the rafters, and the people, too.
I've noticed that aprons seem to be coming back as a trend lately, and she has a few themed aprons, so I thought she might like a nice picnic apron to wear for their many backyard cookouts. Add to my inspiration a neat black and white checked shirt in the donation bag, and this apron was born.
Modeled by my nifty dress form (with my favorite Tshirt preserving her modesty), this apron looks longer than what it actually is, although it is longer than a standard apron, falling to below the knee. My SIL is pretty tall (taller than me anyway) so I made this a bit longer than I would need it, using the whole front of the shirt from just below the collar, all the way to the hem. For a shorter person or just a shorter apron, you could very easily adapt this to be a bib apron, with a tie around the neck and ties added at the lower edge where the sleeves are cut off.
Anyway, to make this, all you will need to do is find a suitable shirt. I chose this button down with a collar and a pocket (because aprons need pockets), but most any shirt should do.
First, iron the shirt. I hate ironing, and avoid it whenever possible, but this will make your job much easier.
Now, cut the shirt straight across as close to the neckline as possible, without involving the collar. Then cut off the sleeves along the seams. You can pick out the side seams, but this shirt was very ruggedly constructed, with jeans-style side seams, so I just cut them out, as well.
Pin the button plackets together, and run a straight stitch up both sides of the buttons, through the top and bottom layers. I disguised my stitches in the seams that were already there. Now your buttons look cute, but they won't come undone.
Hem your raw edges. I used a plain old ruler to make where the shoulder seams were cut out more angled rather than curved, by measuring an equal distance from the buttons to each shoulder seam and marking it, then cutting off the excess and folding it over twice and hemming.
I made the ruffle by cutting two 3" wide strips from the back of the shirt and sewing them together to make one long strip. I then hemmed the bottom edge, ran a basting stitch through the top, and ruffled it as I pinned it to the bottom hem of the apron. (Here is a great tutorial for making ruffles. It's sooo much easier than it looks!)
All that was left to do after that was to fold over about an inch of what used to be the neck of the shirt, and sew all the way across to make a casing for the waist tie, thread the tie through the casing (I used a piece of salvaged woven cotton tape, hemming the ends so they wouldn't ravel) and voila! new apron!
If you want to go the extra mile, you can add an appliqué, like I did. The fabric reminded me of a picnic blanket, so I decided a watermelon would be perfect. I just cut a triangle out of red craft felt, a semicircle out of green felt, and sewed them to one corner of the apron where it looked right. Of course, it wasn't until after I had folded it all neatly, tied it with its own strings, and taken this picture
that I realized I had forgotten to embroider the watermelon seeds. {sigh} I did get them done, in the car on the way to her house. I thought about embroidering a line of ants across the bottom, too, but decided against it.
Hope this is inspiring, and if you make a shirt apron using this idea, I'd love to see a picture of it!

Friday, August 27, 2010

Time flies like a banana...


Or did I mix that metaphor? Anyway, time flies and I do not update my blog. I wanted to, I really did, but my garden went crazy and the kiddos went back to school and I got busy spending a bunch of quality time with DH and the kiddos and the school, and... well, that's how it goes. I may not always have something to say, but when I do, it will be here.Since this is first and foremost my place to share crafty awesomeness, I will share a few of the projects I have managed to accomplish over the last year.
  • I planted, harvested and dried loofahs from my own garden. It was pretty amazing - even though we had the dampest, coolest summer we've had for a long time and loofahs like hot dry weather, these things were humongous and grew like crazy all over the front of the house. Unfortunately, I can't seem to find the pictures, and even as large as the loofahs were, the fibers didn't really have a chance to develop and most of what I harvested was not usable. Maybe next time.
  • I made a styrofoam deer head for my sister. It's much cooler than it sounds (or looks in this picture!) Especially since I packaged it as "Uncle Joe Bob's DIY Taxidermy Kit" :)
I have renewed my interest in sewing over this past year. My sewing machine was something that I always wanted, but when I got it, it seemed really intimidating. I have read and re-read my manual many times, though, and started out with some simple straight stitching to make some
  • soother bags ( flannel bags filled with flax seed that are microwaveable and freezable for aches and pains) for part of DH's grandmothers' Christmas presents. Again, no pictures. I am awful at this, I know.
That really got my confidence up, so I made a
  • modified version of this pajama bag for my niece; a
  • toy car tote for my nephew; and, inspired, I even tried making myself a
  • skirt out of some old ripped linen pants. (Lesson learned from this project? Pants that are a bit too big work best! Leaves a little room for new seams.)
I also
  • improved on my pants patches by using my machine to do some simple embroidery on them and jazz them up a bit.
  • made an apron for my SIL's birthday!
And that's just the 'soft' crafts - I also renewed my interest in woodworking and building, finally painted my hallway, and have been planning some pretty heavy yard work. Phew. Makes me tired just talking about it.
There's more, of course. But I think that's enough for now. Details to follow!

Wednesday, July 15, 2009

Furry Friends

I try not to be too crazy about my family on this blog, for their sake and yours, but I just had to welcome my newest furry friend, Zoey the kitty, to the family in a big way. Why, you ask?

1) After the spraying, clawing, and insane howling of our old tomcat, my husband swore to never allow another feline into the house. Ever.
2) After the spraying, clawing, and insane howling of our old tomcat, I didn't think I would ever want another feline in the house.
3) I tried to think of another reason to list here, because three is a nice round number - but really, spraying, clawing and insane howling are way more than reason enough for me to think I would never have another cat.

Anyway, after we sent the tomcat to go live on a farm where he could be happy outside chasing mice*, I really felt the lack of a cat in the house. I knew that there would be no convincing DH to agree to get one, but that didn't stop me from dragging him over to look at the cats in them adoption center in PetSmart, or informing him that there were kittens free to a good home down the road from us.

DH must have picked up on my *ahem* subtle clues over the last two years, because yesterday he came home from work early, changed his clothes and had me get in the car -refusing to answer when I asked where we were going, but assuring me that jeans, sandals, my old Red Wings t-shirt and a messy ponytail were appropriate attire.
I have to say that I had no idea where he was taking me. When he pulled into the parking lot of the Humane League of Lancaster, I actually teared up a little. DH now thinks I am completely clueless, and I have to agree with his reasoning - just a few days ago, DH and Thing 2 were cuddling on the couch, whispering and seeming very secretive. When I asked them what they were being so quiet about, Thing 2 announced, "We weren't talking about getting you a puppy..."
In my defense, it did cross my mind that maybe DH was thinking about getting me a kitten for my birthday, but I didn't expect to be taken to the shelter to pick one out two days before my birthday. Just sayin.


So, Zoey is a sweet, affectionate (or maybe just territorial), four year old calico. This is the best picture I could get of her because she hasn't been still for more than a few seconds at a time - at least, not when I've had a camera around.
She seems to be fine with the boys, but she's not quite sure about the dogs yet (we're keeping her by herself in the guest room right now, with a towel that the dogs slept on to get her used to their smell, as per the instructions from the very helpful staffer at the Humane League). We have introduced the dogs to her, and she got her back up and ran from both of them, but only clawed at Lucky- which is understandable, Lucky has been giddy and goofy since we brought Zoey home, and was a little overly friendly when she was introduced.
Zoey seems pretty relaxed since we brought her home, and eager to get out of her room and explore. Even DH seems to like her - yay! Welcome to the family, Zoey.

*(seriously, that's not just what we told the kids, a nice Mennonite family adopted him as a barn cat)

Tuesday, July 14, 2009

Generosity Rocks Out Loud!

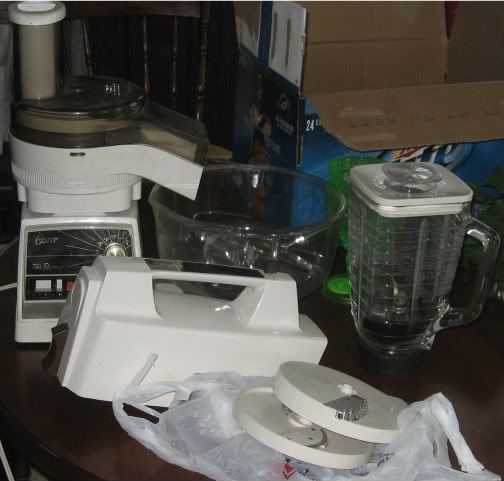
Guess what some sweet Freecycler gave me for an awesome free pre-birthday present? (They didn't know it was a pre-birthday present, but I do!)


Oh yeah. I am so geeked.
Revel in the seventies awesomeness.
I will be able to slice and dice and grate and mix like nobody's business. I'll have to make sure I post pics of the incredible foodness that is sure to follow.
Whatever.
You know you're jealous.
But just cause I love you, I'll post pics of (and the general recipe for) the cake I made for MIL's 50th birthday, anyway. Pre-processor, of course, which just makes it even cooler. (Things 1&2 were soon un-thrilled with being allowed to use the grater, let me tell you... 4 cups of carrots is a lot!)


Crazy-good Carrot Cake*

4 cups grated carrots
1/2 cup brown sugar
1/2 cup white sugar
1 cup applesauce
1/4 c oil
1/2 cup raisins, ~just~ covered in water and microwaved for 30 seconds, then drained
1 cup whole wheat flour
1 cup white flour
1 teaspoon baking soda
1 teaspoon baking powder
1 Tbsp cinnamon
1/2 teaspoon ginger
1/4 teaspoon ground cloves
2 eggs, lightly beaten-? (I think I added eggs; I honestly can't remember.)

Mix dry ingredients, and sift together. In a separate bowl, mix wet ingredients together well, then add to 'dry' bowl. Mix thoroughly, but quickly - Pour batter into greased and floured cake pan(s), bake in 350-degree oven for approximately one hour, or until toothpick inserted into middle of cake comes out clean.

*All amounts are approximate - I looked up a bunch of carrot cake recipes online, and then took the ingredients I wanted and a few I thought should be included, and guessed on how to best put them together. Feel free to use all whole wheat or all white flour, all white or all brown sugar, whatever you happen to like better, with the understanding that results may vary. My cake rose well, and was moist without being sticky.

Frosting (well, kind of)

I made a fondant-type frosting- for the first time! I used the same method as above, researching fondant and then just flying by the seat of my pants. It was delicious - but sweet!

1/2 cup honey
1/2 cup margarine or softened butter
1 teaspoon vanilla extract
dash salt
2lb. bag of 10x confectioner's (powdered) sugar

Combine honey, vanilla, and butter completely, add salt and slowly sift powdered sugar into the mix (I added it by the 1/2 cup), stirring until completely mixed after each time. Eventually (after about 2 cups for me) the mix will be more solid and almost doughy. When this happens, put the dough in the refrigerator to chill for at least an hour. Remove frosting, lightly dust a smooth surface (I just used the counter, but a cold pastry marble would be awesome for this) with sifted powdered sugar and knead more sugar into the dough. When the dough begins to look more flat than glossy, it should be about done. This part you'll just have to experiment with, because you want it to be dry enough to handle, but wet enough to not crack as you drape it on the cake.
I frosted the cake very lightly with store bought cream cheese frosting, then rolled out sections of my frosting and covered the whole cake. They don't have to be perfect, you can trim them and mold the edges together!
With the left over icing, I kneaded food color into it, rolled it out and used a cookie cutter to make the stars (I found an easier way to do it after I was finished - of course- but that's another post) which I then placed strategically over areas where the frosting was less than smooth.
(One caveat - be careful with poking toothpicks into the cake, or wrapping it - this frosting is like play clay, and stays partially malleable the whole time. If you look closely, you can see the wrinkles where I tightly wrapped this with plastic wrap to keep it in place during the 1-1/2 hour drive to MIL's party!)


Ta-daaa!

Wednesday, July 01, 2009

No More Nemesis

Okay, so the guy wasn't really a nemesis, but still... he had a way of pissing people off. On purpose. He was one of those kind of guys who can't resist pushing just to see how far he could before someone would push back- and then once they started pushing back, he would promptly (and figuratively, of course) kick their ass.
I am one of those nicey people who just doesn't like to say bad things about others, so Steven Wells was pretty much my polar opposite. I first became aware of him because of these two articles he wrote about how knitting is completely not as cool as hipster knitters think it is.
Now, I have been crocheting since I was 17 and more recently started knitting, but before the apex of the trend really hit. I was kind of glad to finally see it being promoted as a punk-rock, hip type of hobby- considering that even my loving DH constantly referred to me as 'Granny' when he would see me knitting something (didn't stop him from enjoying the blanket I crocheted for him, but that's beside the point), I thought it was about time that crafting became kind of cool. There's nothing wrong with preferring to wear or use something you've made by hand, rather than using or wearing something that an underpaid worker in Guatemala made with a machine. I also enjoyed the fact that all kinds of people were interested in knitting and crocheting and crafting - from granola crunchers to dominatrices, there was something for everyone in the knitting world, it was no longer just doilies and cardigans.
Well, Steven Wells set me straight. He let me know that no matter what kind of gloss you put on it, no matter what you were knitting or crocheting, it was still not edgy or punk rock. After my initial pissiness, after composing comments in my head that I would never repeat (or type), I just had to laugh. I read a few of his back articles, and was hooked. He just seemed to be one of those people who can't help but tell the truth the way he saw it, everybody's pwecious widdle feewings be damned. Plus, he was hilarious. Since I can take a joke, even if it's on me, I immediately subscribed to Philadelphia Weekly.
Then, the Anticraft replied to his criticisms by posting these wonderful Vlad the Impaler hats. I literally laughed out loud when I saw the quote by Steven Wells at the top of the page. I thought, "Hey, that's a good idea, turn that anger toward creative pursuits, you've shown him." I continued to thoroughly enjoy both Steven's articles and the Anticraft's quarterly issues. My inbox had a new issue of PW this morning, with a surprising title - "In Memoriam: Steven Wells".
I didn't know him personally, or even as a writer for very long, but I really enjoyed his cynicism and sarcasm, so I spent a good portion of the morning learning about Steven Wells and his battle with cancer, and I think that it's a story that would touch all but his most vehement haters. Sure, the guy was abrasive, insulting, and often rude- but he was also honest, and his story is frightening and touching and just made me sad that he had to go now, when I was just becoming a fan.
Farrah Fawcett was before my time, Ed McMahon has always been old to me, and I was never a fan of Michael Jackson (or Billy Mays, for that matter), so other than the surprise of how close together their deaths happened, I haven't been saddened or personally affected by them - but I will sorely miss Steven's wit showing up in my inbox every week.

Tuesday, May 05, 2009

Post # 18, Mother's Day Week

In which I do not kill anything, and I also try my hand at a new craft experience.
I have, rather than the desired 'green thumb', one of those black thumbs that people talk about. It's pretty much a running joke. In fact I currently have a pot that, at Easter, contained beautiful living tulips - but now contains only a brown mass of withered leaves. Maybe this is how tulips behave when they have finished blossoming, I don't know... but it makes me sad when I kill plants, because I really do love them, and they way they look inside the house and out.
When we first moved to Lancaster County, I was overwhelmed with the urge to grow things. Plants just thrive here, and all the conditions come together to create some of the best non-irrigated farmland in the country, possibly the world. Plus, the overwhelming beauty of all the trees and flowers blooming in the spring - it's enough to make even the most avid devotee of silk plants consider attempting to maybe keep at least a little cactus. Just to give it a shot.
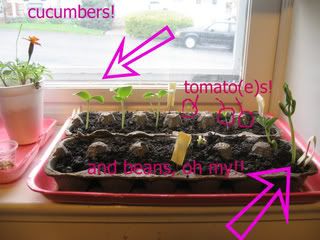
Well, I am proud to announce that, after putting it off for four years, and only one failed attempt, I have not killed some plants! Yay!
Photobucket

(See the bonus marigold? There is also a hyacinth growing next to it- planted in a nifty self-watering pot - that wouldn't fit in the picture.)
All of these were sprouted by moi. Using recycled planting materials, no less. (Pats self on back)
Now, in the interests of full disclosure, I did kill the first round of seeds I planted; they became moldy, and only the beans seemed even interested in trying to sprout... but I have narrowed it down to four possible reasons why this may have happened:
  1. The dirt. I figured that the clay-ey, sticky soil around here is good enough to grow literally tons of corn and what-not, so it should be good enough to start my seeds, right? Besides, those expensive potting soils are just full of chemical fertilizers, anyway. I failed to remember that the soil around here is also liberally treated with non-chemical fertilizer, in the form of liquefied cow poo. How I failed to draw this parallel at the same time that the pungent aromas of spring were drifting in through my open windows, I don't know. Apparently, I am not a smart person.
  2. Over-watering. I figured seeds are dried, they must need a lot of water to get started. I may have been a bit neurotic about the watering.
  3. The water itself. The reason that chlorine is put in city water in the first place is to dissuade bacterial growth. It would only logically follow that trying to make plants grow with chlorinated water would probably be counter-productive. This did not, however, occur to me until the moldy, half-sprouted seeds were already being mourned. In my defense, this is I think the first time I have had city water in my life.
  4. Plants just don't like me. I may to go with this one, since it involves only a slight blow to my self-esteem, rather than acknowledging that I got pretty much every aspect of growing plants horribly wrong.
So, I set out to correct what I could, using my now severely depleted seed supply. I bought potting soil, rather than relying on my own front yard dirt (for now), I watered much less than I had the first go-round, and I also made a point of not watering the plants with any water that hadn't been sitting for at least 24 hours to let the chlorine dissipate. I also smiled at them a little more often to make myself more likable. Maybe that helped, because, as you can see from the picture, I have potential vegetables! It seems as though nearly 80% of the seeds decided to grow - yay! I don't know if that's a good ratio or not, but for me, anything more than 20% would have been considered a success!

In other, somewhat unrelated news, I have tried my hand at jewelry-making!
I made these lovelies for my mom and MIL, for Mother's Day. (Yes, I know I shouldn't be advertising what I made my mother and MIL on the interwebs, where anyone could wander across it and spoil the surprise, but we all - and by that I mean I- know that no one reads this blog anyway, and the chances of either of them stumbling across it and finding out what their gifts are in the next five days is roughly the same as the odds of Death Valley flooding. So I think I'm good.) Here they are, being modeled on my favorite shirt, mother's day birthstone pendants!

Mother's Day,Mom,Mother-in-law,necklace,pendant,jewelry,beaded,birthstone,handmade

Aren't they pretty?
The one on the left is for my MIL, the gems being emerald for my BIL and ruby for my DH. The one on the right is then, obviously, for my mom - aquamarine for my brother, rubies for my sister and I.
I made both of the charms with beads I picked up at the Lancaster Bead Company and some things I had at home already; all the beads and both necklaces ran about $40 total. IMHO, that's not bad for something nice and sparkly like these. Especially if you have gone out and priced mother's rings/pendants first, like DH and I did last week... ~shudder~. Even the 'simulated' (or, as fake as fakey fake can be) gemstone rings cost a ridiculous amount of money.
I like 'em (the moms, I mean), but there was just no way we could buy them both mother's rings.
For each pendant, I used two round silver beads and two smaller hematite beads, plus the birthstone beads and a decorative separator bead in between.
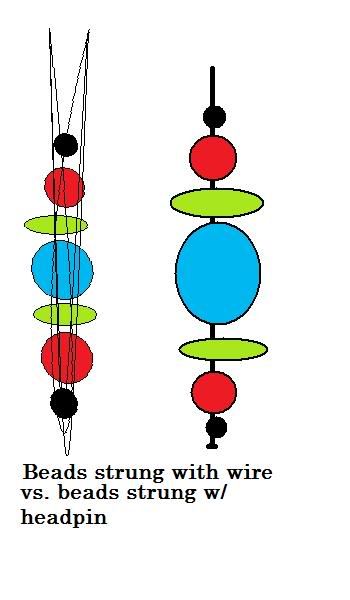
I strung them on thin silver wire, which made this waaay more difficult than it could have been... I had some previously purchased 32 gauge wire, which was quite a bit thinner than what I really needed. I twisted it back on itself (securing the hematite bead at the bottom first to keep all the other beads in place), and then ran the wire up and down the center of all the beads a few times to make it less likely to break. Doing that also created the bail (the loop that the necklace goes through) at the top.
If I were to make another one of these, I would use a head pin instead - much easier and faster to string the beads onto it, and the top could just be bent down with a pair of pliers to make the bail once the beads are strung. Example:
Photobucket

It took me about thirty minutes to make each charm, not including dithering some more over the layout of the beads (DH was about ready to scream in the bead store, I was changing my mind so much, but he was being good because he was trying to convince me we need a PS3... I'll take the cooperation with my indecisiveness however I can get it, though).
Had I bought the headpins, it probably would have taken me five - ten minutes to make both charms, not including dithering time.
I hope the parental units like them, rough as they are. Does the extra (ahem- and possibly unnecessary) time and effort I put in negate the obviously homemade nature of the gift? I'm not above pointing it out, if I have to...
(I could go off on a rant about how the appreciation of a handmade gift generally decreases in direct proportion with the age of the giver, but I'm trying to be positive here...)
I have to get my mom's in the mail, probably today, to make sure it gets to Florida in time, but we should be having supper Saturday with DH's mom, so I'll get to give it to her in person and see if she likes it or if she's just being nice about it. she'll probably like it though.
Happy Mother's Day to all the moms out there! I hope you get something you like, whether it's a piece of handmade jewelry, or a dishwasher (DH has been dropping some not-so-subtle hints that he's probably getting me one - I'm cool with it!), or extra quality time with the kids.